About Me

My photo
Santa Clarita, Ca, United States
I work as a Technology Manager in the Entertainment Industry. My first film was Disney's Dinosaur and have been credited on several films since. I love working on old electronics, especially old radios. I am also passionate about technology and education. I have 4 kids and you can read about us on our family blog.
Showing posts with label My Vintage Radios. Show all posts

Sunday, September 1, 2024

GE Radio-Phonograph Combination Model 326


I was contacted by a coworker who was retiring.  He was moving out of state and had an old radio in storage. He asked if I was interested in taking it.  I went and picked it up from him in a storage facility.  The radio was certainly showing it's age. 


The radio is likely from 1946.  A wonderful piece of audio equipment from the post WW2 era of Andrew's Sisters and Bing Crosby!  - "war production brought new electronic developments".


This had been a family radio for multiple generations, likely purchased in the Los Angeles area in the 1940's.  As I had worked with this person for several years, I wanted to give it an extra special restoration. It's not often that I know the pedigree of a radio that restore and I like to think of myself as a steward of the object preserving it for the future.  Here's a photo of the radio in their home in 1956. It would have been roughly 10 years old at this point. 

Interior tag information.


Initial Triage

I brought the radio up slow on the Variac.  Surprisingly, it was in pretty good shape electronically.  The turntable did not move, but I was able to get the radio to play.  Other than the turntable, some missing dial lights, a large hole in the speaker, and dirty switches it appeared to be electronically OK. 


As the radio was playing, I decided to pivot over to cosmetic restoration as the first priority.

Cabinet

Overall, the cabinet was not in bad shape.  Rather than do an refinish, I simply touched it up with Howard Restore A Finish.  It's a great product, and I've used it on multiple projects. 


Grille Cloth

There are multiple places to get grille cloth, but I like Michael's products at RadioGrilleCloth.com because they are reproductions of original cloth and he lists the original source.  Although he didn't have an exact match, I ordered several choices.  Top to bottom are his products #01, #17, #11A, and #02A


I held them up one by one to the radio and ended up going with their #02A.  I felt it looked best next to the dark wood. 


The Grille cloth was cut to the original backing board and then attached using 3M 77 Spray Adhesive.  


We then we used a small torch to melt the polyester threads to keep them from fraying.  You have to be careful with this step.  Don't get the flame to close!  Best to practice first on scrap piece of cloth. 


Handles

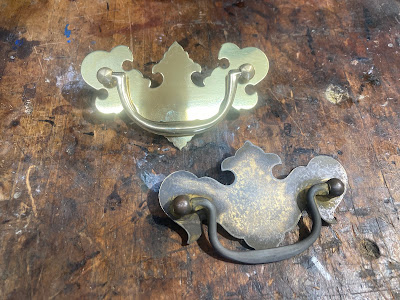
I tried cleaning up the original handles.  Unfortunately, they were brass plated over steel and the iron had rusted which meant they were not going to clean up. Trying to remove the rust was going to take what little brass plating that was left along with it. 


I ended up picking up replacements from Van Dyke's Restorers.  Fortunately,  the "Colonial Revival" style was pretty popular in the mid-20th century and still is popular today so I was able to find a suitable replacement. 


With the cabinet cleaned up, new Grille Cloth installed, and the new handles in place, the cabinet was starting to look pretty good!


Electrical

Unfortunately, I didn't get completely let off the hook on electrical and mechanical repairs. The speaker and turntable needed some attention.

Speaker

There was a hole in the grille cloth that went all the way through the speaker.  Fortunately, the piece of broken away speaker was still sitting inside. However, the paper was VERY brittle.  Rather than sourcing a new speaker, I decided to repair the old one.  I did my usual trick of putting some rubber cement on the broken seams to hold the pieces in place.  There was still one small hole, but this did not effect sound quality. 


Turntable

The turntable is a Webcor VHF Diskchanger model 1841.  I pulled the turntable out and tested it on the workbench.  Operation was rough. The turntable was dry and rusty inside.  I carefully went and lubricated the moving parts with Lithium Grease.  


Once things were lubricated up, everything started popping back into working order.   I went through all the automatic operations and record changing.


Here's a short video of it operating


With this fixed,  all that was left was to replace a few dial lamps.  Most radios of this era take a #47 6V dial lamp and I keep those in stock so I was able to replace the missing ones.  

This got the whole combination up and working wonderfully!


Webcor High Fidelity VHF Diskchanger Manual

The radio came with the original manual for the turntable.  Sharing here for anyone that might need it for their own project. 


Also, here is the schematic from Antique Electronic Supply.  Their website is a great resource for electrical parts.    


Sunday, February 23, 2020

Connecting the Astatic D-104 to the National NCX-5


I enjoy tinkering with and operating vintage equipment. One recent project has been a National NCX-5. Been hoping to put it on 80M in AM mode. I had not been able to get reliable audio out of this radio and started to suspect the Microphone.  I had been using an old Turner 454C.


I also have an Astatic D-104 microphone and wanted to use it with the NCX-5. However, the NCX-5 takes a standard stereo 1/4 inch plug for the microphone.  My D-104 has a 5 pin CB-type connector.


I thought about re-wiring the D-104, but instead decided to leave it intact. I thought it would be more interesting to build an adapter cable.  This meant understanding the wiring on both ends.

I was able to get the manual to the NCX-5 on the Bama site. It showed how to wire up the 1/4 inch stereo jack.


The D-104 on the T-UG8 stand was a little trickier.  There were multiple connections to contend with.  Fortunately, the bottom of the microphone had a schematic.


A little time with the Ohm Meter and I was able to figure out the pins on the Mic plug. Notice that the switch is in the "R" position.


The pins on the D-104 were as follows.

Pin Color Purpose
1WhiteMicrophone
2OpenOpen
3BlackPTT Switch
4ShieldGround / Mic Ground
5RedPTT Switch

I was able to match up the pins and solder the cable appropriately.  Since the NCX-5 uses the same common for the switch and the mic ground, I ran both the Black wire and the Shied to the shield/ground on the National.  Here's what I soldered up.


Pin ColorPurposeConnected To
1WhiteMicrophone->Mic/Middle
2OpenOpen
3BlackPTT Switch->Ground/Base
4ShieldGround->Ground/Base
5RedPTT Switch->PTT/ Tip End

Here's the completed cable.


I soldered up the cable and tested things out.  PTT worked great and the radio appeared to be putting out clean audio in my tests.  Next step is some on the air tests and AM QSO's.


Saturday, December 8, 2018

Precision Apparatus E-200C Signal Generator

I needed a signal generator for my repair bench and was considering purchasing one. There are many good options under $200 that can be considered.  However, my dad had several old ones in his collection  that were in unknown condition.  I chose this one as a project.


Overall, it's a pretty nice unit with a vernier dial and large display.  It also has 400Hz audio output for testing audio circuits.  It clearly was going to require some physical cleaning as well as some electrical repair.


The inside is well organized and easy to service.


I was able to find the manual on the Bama site : https://bama.edebris.com/manuals/paco/e200c/  It wasn't an exact match, but seemed reasonably close.

There did not appear to be consistent RF output.  I suspected the electrolytic filter capacitor and decided to swap it out. It was an interesting multi-section capacitor with the elements in series.


I created a similar setup with modern capacitors.  I used shrink tube to emulate the original color configuration. 


I could have left it like this, but I thought it would be nice to keep the original appearance.


I always enjoy the challenge of trying to maintain original appearances on equipment so I hollowed out the original cardboard shell and placed the new capacitors inside. 


 I tested all the tubes and they all tested new.  Some of the dials were flaky so I cleaned them all with electrical cleaner and that brought them all back to life. I then tested it out.  My desktop multimeter has a frequency counter so I hooked it up to the Signal Generator.  The 130Khz setting (inner circle on dial) shows 130Khz on the meter. Looks good!


 Should be a useful tool for future projects. The next step was to work out the leads. This device has an old style Amphenol 75 series microphone connector.

I'd have to make a choice, do I swap out the connectors for something modern (i.e. BNC connectors), or try to find the old style plug?  I decided to quest for the original style plug.  Found one at Surplus Sales.  It's an Amphenol 75-MC1F.  There were also some good options on Ebay.  I was able to build a cable.


I then ran it through its paces with the cable in play testing from 90-200Khz. I would test more, but my tester only goes up to 200Khz. (200 Kilocycles).


Sunday, September 23, 2018

1938 International Radio Model 735

My dad picked up this radio at a garage sale and passed it on to me as a project.  He hadn't done any testing or opened it up so condition was unknown.  Here's how it looked when it arrived on my workbench ready for a look.


The International Radio Corporation started making radios in 1931 and became somewhat famous for their Kadette series of radios. 


The founders later diversified into the camera business to form the Argus camera company which was a 50's icon of American photography.  (More info here)  I have a few of these cameras that all need work.  Maybe I'll make those a weekend project some time and create a new blog post. :)


Cosmetic Work


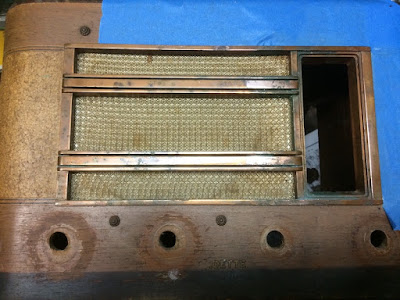
The front grill had a lot of corrosion.  The copper had turned green.


I wasn't sure if it was pure copper or if it was copper over Zinc.  Also not sure if it had a lacquer coating or not.  I decided to try lightly polishing some of the corroded spots with Simichrome polish.


Well, it became pretty clear that this was an "antiqued" copper finish with a lacquer wash over copper.  Polishing was going to turn it all to "bright" copper.  That might not be so bad, but I decided to take a break and move on to electrical work.


One knob was missing from the front.  Fortunately, I keep knobs in stock.  I found one that would work for now.  I'll revisit this later and see if I can get them all to match.


Looking at the electrical, the radio still had an original service tag.  Apparently this radio used to live in Whitehall Montana and was repaired in Butte Montana in 1946.  I can imagine a late 30's or early 40's car taking the 26.6 mile trip from Whitehall to Butte to get the family radio repaired.


I opened up the radio and found it pretty dusty dirty inside. Some compressed air worked out much of the dust.


The tube sleeves were pretty rusty.  I thought it would be nice to clean them up so I made use of my favorite rust remover - Evapo-Rust.


After time in the Evapo Rust, At least the covers are not brown any more.  I suppose if I was really ambitious I could polish them.


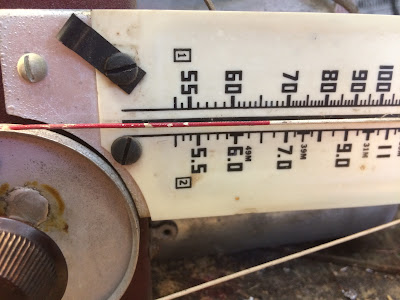
This radio had a bit of an unusual dial.  It's simply the dial cord strung through the dial and painted red.  It needed some touch up so I touched it up with model paint. 


Electrical - Capacitors

Quickly identified a leaky capacitor.


There was also a large paper capacitor.  Considering the swelling, this was probably something I was going to need to replace, but replace with what??


There were no markings except for some numbers that were barely legible.  This one was a bit of a mystery.   Was that 159? 459? Then 63?  Were these values? Part numbers? voltages?


Fortunately, I was able to find a schematic on the Nostalgia Air site!  Love this site!  Thank you SO MUCH to these folks!!!

Looking at the schematic, it listed a capacitor number 459.  Hmmm... that might be a 459. That would make this a three section capacitor with each section being 10mfd.  Since there were 4 wires, this seemed plausible.  Let's go with that!


Rather than cut and remove, I wanted to keep the original appearance.  I decided to open up the
old foil/paper capacitor and solder new capacitors inside.   First I had to remove the original foil and tar.


I then was able to get to the leads inside the paper shell.


\

Here it is with the new capacitors safely installed within the old paper shell. 


I had muddled audio on the output. I expect the the connector capacitor between the 6C5 and the #43 tube which carries the audio from one tube to the other.  I replaced it and that cleaned things up. 


Electrical - Tubes

The schematic listed the following tubes for this radio.
  • 6A7 - Oscillator / Mixer
  • 6D6 - IF Amplifier
  • 6H6 - Dtector / A.V.C.
  • 6C5 - 1'st A.F. 
  • 43 - Audio Output
  • 25Z5 - Rectifier 


Two of the six tubes in this radio still bore the original Kadette brand name which means they likely were originals.  This is not uncommon on the radios I check.  Tubes last a very long time.


This radio actually had a 7th "Tube".  It's a ballast which is more or less a light bulb.  The tubes are all in series so their filament voltage needs to add up to 115V.  Without this tube, they only add up to 74 volts.   This little heater sits there and gobbles up current to keep the voltage in line. 


Unfortunately, one tube was missing.  The number 43.  It's a 25v audio output tube. 


Now, normally, this would not be a problem since I keep a lot of tubes in stock.


Though, I didn't have any number 43 tubes so I had to source one.   I found one on line and got it in place.


The radio lit up but did not play.   Turns out I had two other bad tubes that had to be swapped out.  The 25Z5 was lighting up but not putting out any voltage.  The 6C5 was dead and my tube tester verified that.  Then the anode cap was falling off on the 6D6 IF amplifier. I didn't want to try repairing it.  I just replaced it.


All in all, this meant 3 bad tubes and one missing.  That's more tube replacement than I normally have to do, but this is a rather old radio and looks to have been used quite a bit.


The electrical cord was looking pretty bad so I wanted to swap it out.  I wanted something that looked period correct.  Turns out they had a fabric covered extension cord at Target.  I used that.


The radio is playing fine and sounds clear and strong on the AM broadcast band.  The radio is supposed to cover short wave bands and I'm not getting anything on there so I'll need to revisit it. Work on this radio continues. I'll update the blog post when I pick it back up again.