About Me

My photo
Santa Clarita, Ca, United States
I work as a Technology Manager in the Entertainment Industry. My first film was Disney's Dinosaur and have been credited on several films since. I love working on old electronics, especially old radios. I am also passionate about technology and education. I have 4 kids and you can read about us on our family blog.

Thursday, October 3, 2019

What We Need From Management


Over the years, I've spent time as a Developer, Project Lead, and Scrum Product Owner as well as a manager.  In managers,  I started to identify traits felt worked well, and then traits that didn't.  I started curating a list of what I felt worked best.  This is a living list and I occasionally change things as a I learn.


  • Serve The Team 
  • Management is a service position. Be sensitive to the needs of the team as they rely on you to find resources, eliminate distractions, help with organization, resolve conflicts, communicate important information, and help provide redirection when things go wrong. 
  • Help With Conflict Resolution 
  • There will always be personality conflicts within a group. Sometimes it takes someone with the "manager" title to help diffuse them. 
  • Provide Resources
  • Every product owner, stakeholder, and customer is going to advocate for their interests (as they should).  Relationships will develop as folks become familiar with the needs of others.  Yet, the resources of a technology department are finite. The manager needs to spend time understanding these needs and how they reflect to business value so resources can be spent where they have the most impact. 
  • Communicate The Wider Vision 
  • With greater exposure to the long term vision of an organization, the manager holds valuable information to share about where the organization is going. Although it's important that the team understand these things, they shouldn't have to sit through hours of meetings to gather them.  
  • Provide External Visibility
  • The team is focused on their project. The Manager has bandwidth to get visibility into the projects of other groups by communication with other managers. This can can then be exposed to the team to point them into areas that will need their attention.
  • Help With Meeting Attendance
  • A single one hour meeting can cost between 4 and 8 hours of development productivity.  However, as someone who already attends meetings full time, the manager's cost of attending  meetings is low. The manager then has the ability to communicate the important and critical points back to the team. 
  • Allow The Team To Work Out Their Process
  • Documentation,  task/bug/defect/story tracking, version control, tests, design reviews, code reviews, testing, and documentation are all very important parts of software development. They are the things that separate a "Programmer" from a "Software Engineer".  As a software engineer has these things in their wheelhouse,  the manager should respect the decisions of the team. A manager should  suggest ways things could be better, help evaluate options, and help build consensus if folks can't agree, but ultimately, it's up to the team. 
  • Allow Room To Take Risks
  • The team is going to make wrong decisions, and do risky things. It's important that management give the team room to to do this. 
  • Keep A High Level
  • Management maintains a close relationship with other managers so they may make suggestions around priorities and staffing.  Certainly the manager should work with the team on the long term roadmap.  However,  there should also be room for folks to experiment.  A developer may pick up a small task in between meetings or respond to an e-mail that is not a primary task and they need the freedom to do this. 
  • Suggest Opportunities For Growth
  • Whether it's specific training opportunities, advanced education, speaking and interview opportunities, professional organizations, or cross divisional relationships, the manager should aggressively search out these opportunities for the team and make them aware.  Folks do their best work when aligned with their passion. Although management might have a passion for a particular process, language, or platform, this might not be same as the passions of their people. People should be allowed to follow their own passion as much as reasonably possible. 
  • Manage By Walk Around
  • Management is something that has to be done in person. Get out and talk with the team every day.  Video conference and phone calls are not the same. 

Thursday, August 1, 2019

Wet Plate Photography In Yosemite

We took a trip to Yosemite to camp and take wet plate photographs. Worked both from the campsite and also from the back of the car. here was the typical campsite setup. Darkroom was set up on the camping picnic table.


Also worked with the darkroom in the back of the car.  This attracted a lot of attention.


Also Half Dome. 


Overall, got a lot of shots of the valley. 


Also got some photos of the adjacent campers. 


As usual, we set up our vintage camping gear and some of our equipment from reenactments. 


Ah, Love camping breakfasts!


On the way home, we stopped and visited Will Dunniway at his home in Coursegold.  Will has been doing wet plate photography for decades and is well known and respected in the field.  He had some great tips and suggestions on improvements for next time.  I posted some of his notes here : http://mattschnittker.blogspot.com/2019/06/a-chat-with-wet-plate-photographer-will.html


Overall a great vacation and a great trip. Going back to work was a challenge. I think a few more days, weeks, months in the field would have been just fine!

Monday, June 10, 2019

A Chat With Wet Plate Photographer Will Dunniway

I had the privilege to chat with Wet Plate Photography master  Will Dunniway. He is an amazing resource and passed on some really great advice.  I've summarized our talk in the following notes for the benefit of others.

Chemicals

The Silver Bath

  • Mix your bath silver bath at 9% silver nitrate.  
  • You can only make wet plate photos if the bath is between 55F and 80F.  Beyond that range you will have problems. 
  • Once you've used the bath to make a picture, it will have some ether and other chemicals in it.  Treat the bath as light sensitive.  Otherwise, you will get veiling on your images due to the particles that build up in the silver bath when exposed to light.  Of you do get veiling, use a cotton ball to swab the image and remove it. 
  • The bath will accumulate ether.  You need to let it ventilate.  When doing an event, take a break at lunch time for a couple hours or overnight and let the silver bath ventilate in safe light with the lid off. 
  • Once mixed, measure the specific gravity.  You can then use this to measure later to determine how depleted your bath has become.
  • Over time, the bath will get depleted.  Keep track of how many plates you've made with it.  You'll need to recharge it.  In the field, Will carries carries two backup silver baths.
  • Will also carries a "recharge" bath which is 200ml of water with 50 grams of silver nitrate to replenish the silver when depleted.  He just adds a little "glug glug" to the bath to replenish.
  • Make sure you always use distilled water, never tap water. 

The Developer

  • Never leave your plate in the developer for more than 15 or 30 seconds.  Modern darkroom chemistry allows you to "push" or "pull" by varying development time but that does not work with wet plate.  Keep your development time consistent. 
  • Watch for the shadows under the eyes.  Having a good bright safe light will help with this. 
  • Once development is done, wash the plate in distilled water to remove developer before fixing.  You can now safely expose the plate to light and fix in regular light.
  • Adding a pinch of household sugar to 1000ml of developer to help slow down the development process. Acid slows it as well, but too much acid will fog the plate. 
  • When mixing in the alcohol, make sure you have 90% (180 proof). In some states, EverClear is only 75% alcohol (150 proof)so you'll have too much water. 

Fixer 

  • KCN is easier to work with than Hypo if you can get it.  You can rinse a KCN plate in a bucket of water.  Hypo requires running water and much more time. 
  • After the fix, wash with tap water.  When removing from tap water, rinse with distilled water - This keeps water spots off of your work.  
  • When using KCN, If you ever see blue in your Fixer, this means you have somehow gotten developer into your fixer and made Prussian blue.  This is a warning sign.  Something is wrong with your process.  You should not be getting developer mixed with fixer

Collodion

  • Carry two collodions into the field.  One fresh and and newly made, and one older.  This will help with troubleshooting.   If collodion gets too old, it can cause problems.  Specifically:
    • Older collodion is more contrasty and less sensitive.  It needs more light.
    • Very old collodion can give problems when you varnish.  The varnish can melt the image. 
  • The "Old Reliable" collodion mixture will last about a year. This is because it does not have Ammonium Bromide.  The Ammonium Bromide solutions are only good for three months.  Will uses Potassium Iodide and Cadmium Bromide. 
  • You can actually make collodion using nitrated cotton (14% nitrogen).  Note that this is NOT gun cotton.  Nitrated cotton is not explosive.  You would need to make this from scratch at home since you can't easily ship it. 

Camera

  • It's really best to get a period camera and period lenses.  This is going to give you your best results. 
  • Lots of folks have problems trying to use a converted dry plate camera.  For starters, the film holders do not have as much clearance so you sometimes get streaks across the plate when you open and close the plate holder. 

Darkroom

  • Safelight - When working at home, use Thomas Duplex safelights. They use a Sodium Vapor lamp that takes about 5 minutes to warm up, but are very bright and will help you see the plate as it developers.
  • Color - Many of the early Darkrooms were yellow.  Will toured a few of them and they are all painted yellow. Will suggests painting yours "Curb Yellow" since it keeps it bright, but does not reflect blue or UV.
  • For your field darkroom you should have interchangeable lenses.  You'll want yellow in the morning, then warm orange, finally dark red at noon.  This allows you to protect your plates as the light changes. 

Exposure

  • To prevent light leaks, wrap the entire camera in cloth.  To prevent glare when you take the photo, hold the slide over the top of the lens. 
  • If you have problems with your photo being too dark or too light, change your exposure.  Do not try to fix exposure problems in the darkroom.  Always fix your problems in the camera.
  • For you backdrop, use either Teal, or 19% gray. 
  • Exposure will change during the day.  In the morning, there is a lot of blue.  Around noon, the colors get more muddy and there is more red.  Many folks will not shoot between Noon and 2PM.  In the later afternoon, things get better.  

Other Notable Wet Plate Artists

Will also recommended some of his other colleagues to use as resources for learning the process.

Tintype Exposure Problems 

We talked about a few plates I had taken and I asked his advice on some problems.
  • Black Streaks- These two photos were taken consecutively.  The first was OK, though it did have some gray splotches (that rub off, discussed later).  The second was taken immediately afterwards, but had black streaks throughout the photo.  This often happens when the door to your film holder is dirty with silver.  The silver can rub across the plate.

  • Silver Scum!  - Will warned about letting your silver bath get exposed to light.  This is the result.  You get veiling over the image.  This can be removed with a cotton ball.  These images show before and after cleaning off the veiling. 


  • Tip Up Your Hat - On this photo, I forgot to ask the subject to tip up their hat.  The uniform, hands, and background are clear, but the face is dark.  Folks usually don't want a photo where they can not see their face.  Will noted that many of the old west photos have cowboys with their hats tipped back.  This was by request of the photographer.  It was not an old west style, it was a way to make sure the photographer got an image of your face!


  •  Muddy Plates - These look like improper exposure/development ratio.  Will strongly advises using a period camera instead of a converted dry plate camera.  It's also worth checking for light leaks and checking temperature of the silver bath.  Make sure not to leave your plate in the developer for more than 15-30 seconds. 
 

Will On You Tube

There are also some really good YouTube videos of Will from some of his workshops and classes.  Here are a couple that are packed full of information. 

Wet Plate Introduction

Here is an introduction to the process with lots of good historic details.


Choosing a Lens

This video is specifically about older lenses.  Some of the following suppliers are discussed
  • C.C. Harrison - probably the best, but inconsistent quality. 
  • Dallmeyer - were considered the best in their day.
  • Darlot - Talked about the pillbox design


Varnishing

 In this video Will demonstrates varnishing. 


Monday, June 3, 2019

Learning Wet Plate Photography - Our First Public Event

My son and I have been on an adventure to learn wet plate photography for an event at his school.  After several experiments in the backyard, we tried photography in the field at the Fort Tejon Dragoon Days event.  We then practiced some more in the backyard making photos for the neighbors throughout the day.  We felt pretty confident that we could consistently make an image.


Since I help out at Fort Tejon, we decided to try setting up a photo booth at the event as a fund raiser for the fort.  It would be a great way to get more practice in the field and would also be a chance to raise some money for the fort.  Since the plan was to basically break even and give profits to the fort, we priced the photos at $20.  We figure our 4x5 Tintypes cost us between $3 and $5 each to make in materials, so we'd make enough to cover gas and food and raise some money for the FTHA.  I know a lot of folks charge more for tintypes, but we are just getting started.

Our Booth

We set up our shelter that we use for other events and I borrowed my wife's craft fair booth from RandomSacks.  We set up our darkroom on the table and worked in the open so folks could watch the process.  Here is Brandon mixing some developer.


Here he's  heading off to take a photo.


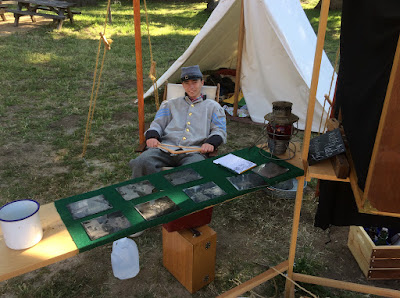
We set up an assembly line to process the photos then put them out on green felt to dry.


Things went pretty well for the morning.  We made several photos that came out pretty decent.  We had a few happy customers and made a few extra portraits of interesting people and the family.


Though,  in the afternoon, we had problems... lots of problems.  We started getting images that were covered with fog.


After several failed photos, I tried to isolate the problem.  Was it light leaks?  Was it a chemistry problem?  I tried pouring a plate, sensitizing it in the silver bath,  and then putting is straight into the developer.  I was horrified with what I saw.  The plate was muddied with gray, it should have been totally black!


Since we couldn't make clear images, we decided to stop for the day. We were just wasting plates and chemicals.  We'd go home, figure things out, then return for a future event.

So What Happend?

We were stumped for a while till I found out some advice from Will Dunniway -  he says to "Treat Your Silver Bath like it is light sensitive".   You see, as you make tintypes, it carries ether and other chemicals into your sliver bath.  Your silver bath becomes light sensitive.  If the bath exposed to light, you carry exposed silver halides on to your plate.  When you develop the plate,  you end up with a developed haze over your image!!!

Although we didn't know it at the time,  this silver haze actually cleans off!!


You actually can clean the plate this while it is still wet.  You can't easily touch the plate, but you can use a cotton ball to rub it clean!  So, now I know.  Keep your silver bath clean, and treat like it is light sensitive!  Also, ventilate in your darkroom it at lunch time or overnight to help the solvents evaporate!

Continue With Wet Plate?

We really enjoyed the event at Fort Tejon, but it was clear we still have a lot to learn.  We'll probably continue to practice at future Fort Tejon events to get better. Hopefully, we can get good enough to attend other events as period photographers.


Sunday, May 19, 2019

Learning Wet Plate Photography - Working In The Field

We've recently been working on learning wet plate collodion photography.  After we ran a few tests at home, it was time to try a test in the field.  This meant building a field darkroom and making all our supplies easy to transport.


The Portable Darkroom

I built a folding table years ago for use on camping trips.  Rather than start from scratch, I decided to repurpose the old table.  I removed the legs and added black felt to the inside.  Also cut a hole in one of the sides and added a square piece of glass that I had painted red.  This will act as the safelight.  The collodion emulsion can not see red, so you can work safely inside with red light.


  I also added a shelf and some small drawers.


Here's how everything looked once it was painted and finished.  Next step was to add the "tent" portion to make it light proof.

I soldered some copper pipe to make elbows and got oak dowels for the tent poles.  I made sure it was large enough that I could stand inside of it.

We then made a tent out of period correct linen to block out the light.
Inside of the tent.


Transporting Supplies

We also wanted a nice way to be able to carry all the chemicals.  We thought about using a plastic milk crate or tub, but wanted something more period correct.  I was able to get a wood caddy at Micheal's craft store and create wood compartments inside. I then lined it with Felt.


I then added some wood trim to the outside to give it an appearance of period luggage.

Added a nice coat of period correct Shellac (never polyurethane) to give it a little more of a finish.


Here's how the caddy looks with the bottles in it.

We were then ready for the road!!  Brandon like's wearing a frock coat and a bowler hat when doing photography.


Fort Tejon Dragoon Days

We headed up to Fort Tejon for their Dragoon Days event.  This is a neat event to visit if you've never been there. We set up the Darkroom and the chemicals. 


Pouring a plate in the field was especially challenging with wind, bugs, dust, and distractions. 


Though, we were able to make an image.


Once we had proof of concept, we started taking photos of people.


Here is Kevin with his portrait after it fully dried.


Scratched this one while processing. :(


Got a nice group photo.  This exposure was in the afternoon so the exposure time was 4 Seconds!  It's still a little bit light, but came out OK. 


 Overall, our success rate is about 50%.  Clearly we need more practice before we are ready for the major leagues.  Though, we felt we had enough success in the field to try in the classroom.  Brandon brought the entire setup to school.  He's teaching the 8th grade class how to do wet plate so they can run a photo booth at the Annual SCVi 8th grade living history event. / Civil War Reenactment.  


Continue Reading : Up Next -> Our First Public Event

Wednesday, April 17, 2019

Learning Wet Plate Photography - Tintypes

Last year, we built a Telegraph for SCVi's Living History day.  This was a project with my daughter Emily and she did an amazing job learning morse code and working with her fellow 8th graders demonstrating 19th century communications.  For this year, it's Brandon's turn in 8th grade and he decided to take on an even more ambitious project - Wet Plate Photography!

Wet Plate Photography is one of the earliest photographic processes used from the 1850's to the 1880's. It involves making your film, chemicals, and sometimes even your camera from scratch.

Planning

This project required a lot of specialized supplies and pretty high learning curve.  I picked up Quinn Jacobson's book : Chemical Pictures The Wet Plate Collodion Book: Making Ambrotypes, Tintypes & Alumitypes to get started.  It was a great resource!

Obtaining Supplies

Chemicals

For the first pass, we sourced chemicals from multiple locations. Since we were doing this with an 8th grade class, we had to avoid the traditional Cyanide and Cadmium based chemicals.  This meant using Sodium Thiosulfate for the Fixer and using a non-cadmium collodion.

Here is a comprehensive list of everything we had to purchase. Although these are just starter quantities, it gives an idea of what you'll need to purchase to make your first few tintypes.   I have to give a call out to Bostick and Sullivan.  What a great resource! 


StepItems PurchasedCost
Step 1 : Pouring The PlateBostick & Sullivan Cadmium Free Collodion86.89
Modern Collodion Tintype Plates14.99
Ethyl Ether (For restoring collodion)38.65
Step 2: Sensitizing The PlateUPI Metals Silver Nitrate 100g85.61
Distilled Water From Grocery Store1
Step 3: Development95% Ethanol Alchohol35.35
Ferrous Sulfate 500g12.62
Glacial Acetic Acid 1000ml18.79
Distilled Water From Grocery Store
Step 4: FixingSodium Thiosulfate 500g7.04
Step 5: VarnishSandarac Varnish 250ml28.35
Total Cost329.29

If you prefer Amazon, some of these supplies are available there as well for similar prices:


Camera

For the camera, I decided to use our Graflex 4x5 sheet film camera with a Fim Pack adapter.  I had a few of them so it was an easy place to start.


The film pack adapter is not a perfect fit, but was fine for getting started.  We used Balsa Wood to add a little meat to the sides to make the fit a bit tighter.


Preparing The Chemicals

We decided to use 19th century Apothecary bottles to give an authentic appearance to our supplies.   Since we have a darkroom setup at the house, we used regular 5x7 photo trays for the chemicals. 


We used the recipes from Quinn's book to mix chemicals in the right quantities and proportions. 

Our First Tintype

Pouring The Plate

This is the first step of creating a tintype is to pour the collodion on to the plate.  This is arguably the most important, and also the most challenging part of the process.  Although I read instructions on this multiple times, it helped much more to have an example.  Fortunately, Quinn Jacobs has a nice  YouTube video showing how to do this.


Silver Bath

Second step is to dip the plate in Silver Nitrate bath for 3 minutes.  The silver nitrate reacts with the salts in the collodion to make light sensitive silver bromide.  Since the plate becomes light sensitive in this step, it has to be done in the darkroom.

Exposure

The light sensitive plate is loaded into the film holder.  We then have a few minutes to get it to the camera and expose the photo.  Since the film holder is light tight, it can leave the darkroom with the tintype inside of it.

Development

The film holder is brought back to the darkroom and developed in the developer for about half a minute.

Fixer

The tintype is moved to the fixer and this clears the plate so you can see it.  Once fixing is done, the plate is no longer light sensitive.

Results

Our first results fell pretty short of satisfactory.  Instead of the images we intended to photograph, we came out with muddy, cloudy images.  Although it was good to at least see were were getting some imagery, we weren't getting anything close to what we expected.


We theorized that we were both over-developing, and under-exposing.  We decided to do a simple print with just a simple object. 


This worked!  Although there were some pretty severe shortcomings in my ability to pour the plate. You can see that we have some density variation in the negative.  Maybe the way we are pouring it?  Also, there's some color in the dark part of the image.  Still more to learn, but we had basic proof of concept.  For the next phase, we set the camera up outside.  


We did exposures at F4 for 10, 5, 4, and 3 seconds.   These were not so lovely. However, we did have some things in there that looked like branches and vines.  I think we heavily overexposed. 


Looking closely in the sun, you can see some grape leaves and vines.  


Progress!!  Though we still have quite a way to go. We iterated on our process quite a bit, practicing our pouring, trying different exposures, being careful about development time, and finally started to get some decent results.  Here is the grape vine with a 2 second exposure at F4 with about 30 seconds in the developer.


With more practice, we were able to try photos of people.  Here's one of Brandon.  It was SO exciting to finally have something that looked like a photograph!


We took a couple more.  Here's Brandon and I after the plates dried.


We still have a few things to figure out...
  • Why do we have a gray haze on the plates coming out of the fixer? It washes off, but requires a wiping off with a thumb.  Is that normal? 
  • How long should we rinse? Should we use Hypo Clearing Agent? 
  • There's black specs in the photo.  Are those an impurity somewhere?  How do we get rid of them? 
We'll keep practicing and trying things.  Hope to have better images soon.  There's also a few classes I might consider taking to get some pro tips such as this one at Los Angeles Center of Photography.

Continue Reading : Up Next -> Attempting Wet Plate In The Field.