I was contacted by a coworker who was retiring. He was moving out of state and had an old radio in storage. He asked if I was interested in taking it. I went and picked it up from him in a storage facility. The radio was certainly showing it's age.
The radio is likely from 1946. A wonderful piece of audio equipment from the post WW2 era of Andrew's Sisters and Bing Crosby! - "war production brought new electronic developments".
This had been a family radio for multiple generations, likely purchased in the Los Angeles area in the 1940's. As I had worked with this person for several years, I wanted to give it an extra special restoration. It's not often that I know the pedigree of a radio that restore and I like to think of myself as a steward of the object preserving it for the future. Here's a photo of the radio in their home in 1956. It would have been roughly 10 years old at this point.
Interior tag information.
Initial Triage
I brought the radio up slow on the Variac. Surprisingly, it was in pretty good shape electronically. The turntable did not move, but I was able to get the radio to play. Other than the turntable, some missing dial lights, a large hole in the speaker, and dirty switches it appeared to be electronically OK.
As the radio was playing, I decided to pivot over to cosmetic restoration as the first priority.
Cabinet
Overall, the cabinet was not in bad shape. Rather than do an refinish, I simply touched it up with Howard Restore A Finish. It's a great product, and I've used it on multiple projects.
Grille Cloth
There are multiple places to get grille cloth, but I like Michael's products at RadioGrilleCloth.com because they are reproductions of original cloth and he lists the original source. Although he didn't have an exact match, I ordered several choices. Top to bottom are his products #01, #17, #11A, and #02A.
I held them up one by one to the radio and ended up going with their #02A. I felt it looked best next to the dark wood.
Handles
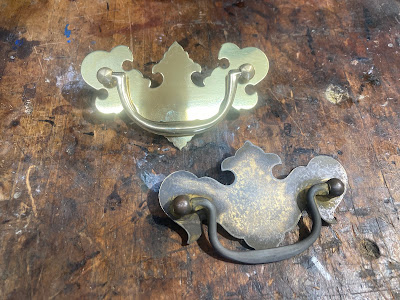
I tried cleaning up the original handles. Unfortunately, they were brass plated over steel and the iron had rusted which meant they were not going to clean up. Trying to remove the rust was going to take what little brass plating that was left along with it.
I ended up picking up replacements from Van Dyke's Restorers. Fortunately, the "Colonial Revival" style was pretty popular in the mid-20th century and still is popular today so I was able to find a suitable replacement.
With the cabinet cleaned up, new Grille Cloth installed, and the new handles in place, the cabinet was starting to look pretty good!
Electrical
Unfortunately, I didn't get completely let off the hook on electrical and mechanical repairs. The speaker and turntable needed some attention.Speaker
There was a hole in the grille cloth that went all the way through the speaker. Fortunately, the piece of broken away speaker was still sitting inside. However, the paper was VERY brittle. Rather than sourcing a new speaker, I decided to repair the old one. I did my usual trick of putting some rubber cement on the broken seams to hold the pieces in place. There was still one small hole, but this did not effect sound quality.Turntable
The turntable is a Webcor VHF Diskchanger model 1841. I pulled the turntable out and tested it on the workbench. Operation was rough. The turntable was dry and rusty inside. I carefully went and lubricated the moving parts with Lithium Grease.
With this fixed, all that was left was to replace a few dial lamps. Most radios of this era take a #47 6V dial lamp and I keep those in stock so I was able to replace the missing ones.
This got the whole combination up and working wonderfully!
Webcor High Fidelity VHF Diskchanger Manual
The radio came with the original manual for the turntable. Sharing here for anyone that might need it for their own project.
Also, here is the schematic from Antique Electronic Supply. Their website is a great resource for electrical parts.


Lots of work and restorations. Looks like you did a really good job on it. I’m still working on the model T.
ReplyDelete