About Me

My photo
Santa Clarita, Ca, United States
I work as a Technology Manager in the Entertainment Industry. My first film was Disney's Dinosaur and have been credited on several films since. I love working on old electronics, especially old radios. I am also passionate about technology and education. I have 4 kids and you can read about us on our family blog.

Sunday, September 23, 2018

1938 International Radio Model 735

My dad picked up this radio at a garage sale and passed it on to me as a project.  He hadn't done any testing or opened it up so condition was unknown.  Here's how it looked when it arrived on my workbench ready for a look.


The International Radio Corporation started making radios in 1931 and became somewhat famous for their Kadette series of radios. 


The founders later diversified into the camera business to form the Argus camera company which was a 50's icon of American photography.  (More info here)  I have a few of these cameras that all need work.  Maybe I'll make those a weekend project some time and create a new blog post. :)


Cosmetic Work


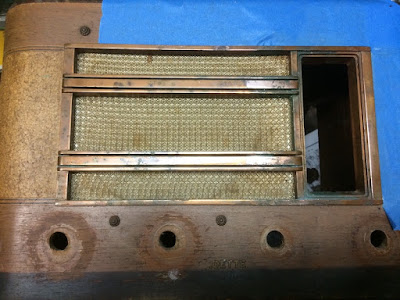
The front grill had a lot of corrosion.  The copper had turned green.


I wasn't sure if it was pure copper or if it was copper over Zinc.  Also not sure if it had a lacquer coating or not.  I decided to try lightly polishing some of the corroded spots with Simichrome polish.


Well, it became pretty clear that this was an "antiqued" copper finish with a lacquer wash over copper.  Polishing was going to turn it all to "bright" copper.  That might not be so bad, but I decided to take a break and move on to electrical work.


One knob was missing from the front.  Fortunately, I keep knobs in stock.  I found one that would work for now.  I'll revisit this later and see if I can get them all to match.


Looking at the electrical, the radio still had an original service tag.  Apparently this radio used to live in Whitehall Montana and was repaired in Butte Montana in 1946.  I can imagine a late 30's or early 40's car taking the 26.6 mile trip from Whitehall to Butte to get the family radio repaired.


I opened up the radio and found it pretty dusty dirty inside. Some compressed air worked out much of the dust.


The tube sleeves were pretty rusty.  I thought it would be nice to clean them up so I made use of my favorite rust remover - Evapo-Rust.


After time in the Evapo Rust, At least the covers are not brown any more.  I suppose if I was really ambitious I could polish them.


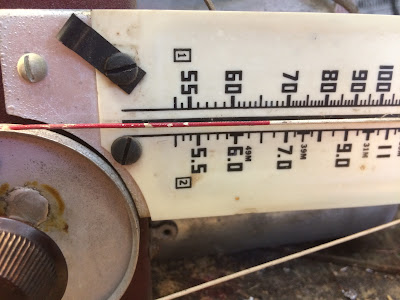
This radio had a bit of an unusual dial.  It's simply the dial cord strung through the dial and painted red.  It needed some touch up so I touched it up with model paint. 


Electrical - Capacitors

Quickly identified a leaky capacitor.


There was also a large paper capacitor.  Considering the swelling, this was probably something I was going to need to replace, but replace with what??


There were no markings except for some numbers that were barely legible.  This one was a bit of a mystery.   Was that 159? 459? Then 63?  Were these values? Part numbers? voltages?


Fortunately, I was able to find a schematic on the Nostalgia Air site!  Love this site!  Thank you SO MUCH to these folks!!!

Looking at the schematic, it listed a capacitor number 459.  Hmmm... that might be a 459. That would make this a three section capacitor with each section being 10mfd.  Since there were 4 wires, this seemed plausible.  Let's go with that!


Rather than cut and remove, I wanted to keep the original appearance.  I decided to open up the
old foil/paper capacitor and solder new capacitors inside.   First I had to remove the original foil and tar.


I then was able to get to the leads inside the paper shell.


\

Here it is with the new capacitors safely installed within the old paper shell. 


I had muddled audio on the output. I expect the the connector capacitor between the 6C5 and the #43 tube which carries the audio from one tube to the other.  I replaced it and that cleaned things up. 


Electrical - Tubes

The schematic listed the following tubes for this radio.
  • 6A7 - Oscillator / Mixer
  • 6D6 - IF Amplifier
  • 6H6 - Dtector / A.V.C.
  • 6C5 - 1'st A.F. 
  • 43 - Audio Output
  • 25Z5 - Rectifier 


Two of the six tubes in this radio still bore the original Kadette brand name which means they likely were originals.  This is not uncommon on the radios I check.  Tubes last a very long time.


This radio actually had a 7th "Tube".  It's a ballast which is more or less a light bulb.  The tubes are all in series so their filament voltage needs to add up to 115V.  Without this tube, they only add up to 74 volts.   This little heater sits there and gobbles up current to keep the voltage in line. 


Unfortunately, one tube was missing.  The number 43.  It's a 25v audio output tube. 


Now, normally, this would not be a problem since I keep a lot of tubes in stock.


Though, I didn't have any number 43 tubes so I had to source one.   I found one on line and got it in place.


The radio lit up but did not play.   Turns out I had two other bad tubes that had to be swapped out.  The 25Z5 was lighting up but not putting out any voltage.  The 6C5 was dead and my tube tester verified that.  Then the anode cap was falling off on the 6D6 IF amplifier. I didn't want to try repairing it.  I just replaced it.


All in all, this meant 3 bad tubes and one missing.  That's more tube replacement than I normally have to do, but this is a rather old radio and looks to have been used quite a bit.


The electrical cord was looking pretty bad so I wanted to swap it out.  I wanted something that looked period correct.  Turns out they had a fabric covered extension cord at Target.  I used that.


The radio is playing fine and sounds clear and strong on the AM broadcast band.  The radio is supposed to cover short wave bands and I'm not getting anything on there so I'll need to revisit it. Work on this radio continues. I'll update the blog post when I pick it back up again.




Sunday, August 26, 2018

Learning AFS Click & Type 2.1

I've been helping out with maintenance of the web site for our local AFS chapter.  The page editor uses a content management and web page editor called Click & Type 2.1.  The editor has a bit of a learning curve so I spent some time experimenting with it.  This posting is about some of my experimentation.

Note:   This posting is just about experimentation with queries and is not meant to be user documentation. 

The Experiment -  Update The "Blogs" page. 

The standard template for AFS web sites comes with both an "Events" and "Blogs" page.  Our chapter web site still had the default "Blogs" Section with default content from 2015. It was in big need of an update.


One of our local host families had just won the AFS Reel Life contest and had been featured on the AFS blog.  I wanted to add this post to our chapter blogs page.  The event had been posted on the AFS Host Family Blog as well so I was excited about updating our blog to feature it.


Since the posting was  already in the AFS content database.   I thought, "How hard can it be to just add this post on our page?"  Seemed like all I had to do was reference the posting ID on our page or maybe pick up on their feed?  Maybe while I'm at it, I can remove these old 2015 posts? 

Attempting To Edit the page directly with Click & Type


The AFS web site editor uses a content management system called "Click & Type".  All the pages are nicely displayed and finding the "Blogs" page is easy.  Within the editor, you can view the page and edit details. Content is edited on the "Content" tab.


I went to the content tab, but sadly, it was blank which mean some "magic" was happening under the hood somewhere.  Click & Type uses an  HTML editor called CKEditor.  Fortunately, CKEditor has a "View Source" option so I checked the source.  Sure enough, there was a query being used to pull content into the page.


Playing with Queries


It appeared that our blogs page was created through a back end database query for "r:usa_news". The query passed in our chapter as a parameter.

     <r:usa_news category="Chapter: California Central Coast" url="../blog"></r:usa_news>

Since my goal was to both remove the old posts, as well as reference the new existing one, changing the query seemed like a reasonable way to go.  I did some playing around and quickly discovered that the Chapter was an important query parameter.  For example:

Postings from San Diego:
     <r:usa_news category="Chapter: San Diego" url="../blog"></r:usa_news>

Postings from Milwaukee:
     <r:usa_news category="Chapter: Milwaukee" url="../blog"></r:usa_news>

Postings from the AFS USA News Blog:
     <r:usa_news></r:usa_news>

It seemed like just displaying the  host family blog would give me what I wanted. This would give me the new host family post AND get rid of the pesky old posts we had on our page. Also it means AFS would essentially be curating the page for us.  I tried several other things.

     <r:usa_blog></r:usa_blog>
     <r:blog></r:blog>
     <r:host_family></r:host_family>
     <r:host-family></r:host-family>


Alas, none of them gave fruit.  I was stuck.  There didn't seem to be a query change that would show the AFS Family blog on the page.  I took a look at the query for the Events page.  It had a similar format so I played with this for a while as well.

      <r:events category="Chapter: California Central Coast" type="upcoming" url="../events"></r:events>

The query change didn't seem to be working out. However, I had a new idea.  If I was able to tolerate the old posts still being there,  what if I created my own new "Chapter: California Central Coast" posting?  This would display the new posting at the top of the old ones.

I'd need to screen grab the image from the AFS web site and I'd also need to copy/paste the text. Though, I was pretty sure a new posting I created would at least display on the page.   Now, that does not clear away the older default postings, but at least I'd get the article up there. 

The Answer:  Re-create the posting. 


Since I wasn't likely to figure the incantation to just show the Family Blog page,  I changed course and decided to just re-create the original AFS posting within our chapter web site.  This is done under the "News" tab in "Click & Type.  I copy/pasted the text from the original AFS posting and screen-captured the image.  I then added the image to the posting (using the "Image" tab) and posted a new "News" article.  Here is what the new posting looked like in "Click & Type".


Once the article was saved, it showed up on the blogs page.  I still have the older 2015 postings along side it, but at least I was able to show the new article.


Now, this does mean that we have two essentially identical postings in the AFS content database, but I can see why each chapter having their own content makes a lot of sense.  Here's both postings so you can see the difference.

Original article : https://www.afsusa.org/host-family/blog/article/?article_id=10146
New posting for our chapter site: https://www.afsusa.org/team/ccc/blog/article/?article_id=10152

The local chapter  article displays properly and looks good.  I'm happy with the result and learned a lot along the way.

Saturday, June 9, 2018

Building A Telegraph

I put together a telegraph to be used the the 2018 SCVi Living History event.  This was a fun project that involved some interesting learning and research.

Figuring Out The Wiring And Power

Old time telegraph lines ran as a single line using ground as a common connector.   The voltage on this single wire could be as high as 100 volts.  The high voltage allowed them to make up for the resistance in the cable and cover the long distances with a single piece of wire.

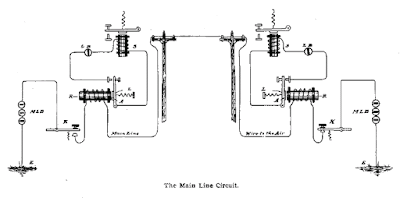
The telegraph sounder at the station ran at much lower voltage, typically 1-6 volts.  Sounders  came in different resistance ratings (rated in ohms) to accommodate the different voltages and the proper sounder for a specific voltage can be computed using ohms law.  (I found a good explanation in this article for folks who want more details.)  To protect the local sounder (and operator) from the high voltage line, a relay was used in the station to isolate it from the main line.  Here is an illustration of a typical circuit.


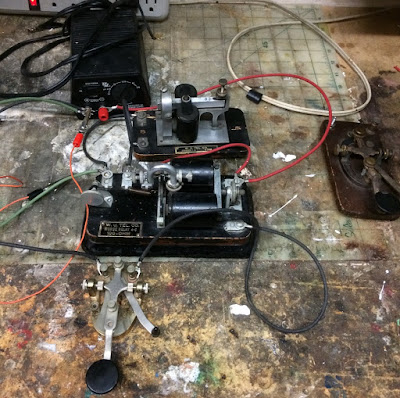
Here is an example sounder and relay that I picked up at the beginning of the project to test this out.  It's a 4 ohm sounder and a 100 ohm relay.


I connected the two together with a variable power supply to try different voltages.


First Decision: Use Relays? 
I ruled out pretty early on any chance of using high voltages with this project.  The station was going to be operated by kids.  Also, the telegraph run was unlikely to be more than 100 feet so low voltage would be fine.  This meant I could elminate the need for the relay.

Second Decision: Operating voltage?
After testing at a few different voltages, I decided to operate on nine volts.  This was a bit high for my 4 ohm sounders, but it made a nice loud click that I felt the kids would be able to hear better.  Sure, the coils might get warm if used heavily, but I expected the duty cycle required from 8th graders would not be too bad.

Third Decision: Simplex Or Duplex?
If I wanted to be authentic,  I suppose I'd be running one wire and pounding in ground cables at the site.  Though, since this was a short run, I decided to run the telegraph with two wires (duplex).  This would take double the wire, but would eliminate the need to drive a grounding rod at the re-enactment site.

Building the Telegraph Stations

Once I had the design figured out, it was time to build the actual telegraph stations.  I wanted to the telegraph to be as authentic looking as possible, but also be able to be set up and run by 8th grade re-enactors.  I didn't want to spend a lot of money on 19th century equipment so I targeted purchasing equipment from around 1900.  I found some nice old sounders and used keys that I had collected on my own.


I mounted the pairs of keys and sounders on oak boards that I coated with Shellac.  Each board also got a print out of the morse code for the re-enactors to reference in case they forgot a letter at the event.


For the 9V power supplies, I put two 9V batteries in parallel on a piece of oak.  This could be tucked under the table to hide the fact that we were using modern batteries.


For the cable hookups, I actually tried two different designs.  One design used three connectors. I stamped the wood with the hookup.
G = Ground
L = Line
P = Plus side of battery


Though, this requires the person hooking up the wires to understand that one of the wires coming on the telegraph is a "ground" and also the negative on the battery supply is a ground.  To simplify the hookup, I also made some with two hookup locations.  One for the battery, the other for the two telegraph lines.  This also makes it more transparent and intuitive to see that all the sounders are hooked in parallel.


Once I had the stations built, It was time to test them out.  This test is using 9V from the battery supplies.

Training The Learners

The telegraph was going to need to be operated by 8th grade students.  They were all going to need to learn Morse Code and be able to copy/send it in the field.  I put the code on all the stations, but it was going to require practice.  We set up a code key in the classroom and got the kids practicing.  A few of them talked about it in this video.  Credit for the video goes to SCVTV.com.

Deploying In The Field

With all the testing we did ahead of time, things went well the day of the event.  Our telegraph was covered by multiple local news stations!
  • Santa Clarita TV (SCTV)  -  This video did some great overviews with the learners and also got some great coverage of the telegraph. 


  • KHTS Radio (AM1220/ FM 98.1)   - Great closeups of the telegraph in action!  Shows our fake galvanic battery that was supposed to appear as though it was powering the telegraph. 

  • Santa Clarita Valley Signal - Although they didn't cover the telegraph, they did cover some great highlights of the event. 
  • SCVi School Web Site -  They announced the event, but no photos.  They did post some great photos on Facebook which included multiple photos of the telegraph!

My favorite was the one of my daughter operating the telegraph. She did a great job!


My brother also recorded a great video of the overall event.


Hopefully, we can find some more events were we can bring this and demonstrate it.   Maybe we can find some other re-enactments in Southern California Until then at least we'll be able to break it out once a year for the school.