About Me

My photo
Santa Clarita, Ca, United States
I work as a Technology Manager in the Entertainment Industry. My first film was Disney's Dinosaur and have been credited on several films since. I love working on old electronics, especially old radios. I am also passionate about technology and education. I have 4 kids and you can read about us on our family blog.

Wednesday, July 8, 2020

The State Theater In Oroville Ca

One of our family members has been heavily involved in helping to restore The State Theater in Oroville California. Built in 1928, the State Theater is one of a series of theaters designed by Timothy Pflueger.

A wall was built down the center of the theater in the 1970's by United Artists to turn it into a dual screen cinema.  As part of the restoration, the wall has been removed to make it a single house again. The row down the middle shows the scar from the old wall.


The theater also originally had circular seating so each seat faced center stage. When it was converted into a dual theater, a new floor was poured and they changed to more typical straight rows.


The large openings above the stage are for the pipe organ.  These had also been covered up and were opened up in 2018.  Although open now,  here's a few photos of that process while in work to show what went into the restoration.

As seen from the front as organ grille was exposed stage right.


Organ grille from the back in the process of being exposed.


You can see the two projection booths up top.


Each projection window has a 35MM projector with the large film platters.


They also have a couple of original carbon arc lamps which is no longer in use.  These would make an amazing lobby display!


The projection booth also has a fire safe for Nitrate film. A true relic from the early days of Cinema!


The balcony is unrestored. 


They just restored the Wurlitzer organ. I chatted with Dave Moreno who is one of the few in the nation who still knows how to support them. We  talked about the history of the one at the El Capitan.  Apparently Disney got it from a politician from LaCanada who got it from a theater that was demolished that he remembered as a kid.   They had a visiting organist who has played consoles at many locations including the one at the Nethercutt Museum. 

The Organ is pieced together from original parts as well as parts of others. The console came from an auto museum in Sacramento and previously was in Orson Wells house. 


They have restored all the pipes and electronics.  I chatted with Dave Moreno about the electronics. There's an ethernet cable that runs from the console up to the D/A converters up top.  It uses proprietary software but can also operate off Midi files. 


Actuator relays for the organ components. 


Control board closeup.

The pipes from the organ are truly a site to see! The chairs below the bass pipes give some idea as to their size and scale. 


Pipes behind the grill on stage left. 


Here a couple movies we took while in the stage left pipe chamber.  The amazing Jerry Nagano is at the keyboard!


They are also restoring the 1920's murals and paint. They are slowly removing paint in places to see the original colors and finishes. Notice the railing is about a foot lower than modern railing. 


The restrooms remind us of the wonder of Art Deco!


More behind the scenes, the theater is equipped with dressing rooms for live performances. 

Back stage, much of the original lighting and seating has been preserved as well.  There is Serious work to be done in restoration!


Remember the days of physical marquee lettering?


Some old film reels. 


Hey Look!!  A Biunial Magic Lantern! It would be amazing to see this wonderful piece of cinema history come to life again!   This beauty must have been used to show advertisements and announcements for the audience to see while waiting for the start of a feature film in the 20's and 30's. 


The lenses appear to originally have had shades in front so the projectionist could toggle between two images. 


Interesting casting logo.  I wonder what brand it is.


Continuing the back  room tour, there is significant space above the theater in the attic used for air conditioning duct work. Much of the A/C had to be upgraded to bring the theater up to modern standards.  Not very many people get to see this!


And from top to bottom, a few mysteries of the basement!


Hope you enjoyed this tour and history of the Oroville State Theater!  More information can be found in the following links:


Monday, April 27, 2020

New Safelight Window For My Wet Plate Darkroom

When doing public demonstrations, a lot of folks want to watch me make photos. I decided to try enlarging my safelight window so folks could more easily see in.

Here's the old window.


I picked up a picture frame at a local hobby store and also purchased some red window tint online. 

I removed  the old window with a Roto-Zip using the frame as a guide.


Size comparison


New window installed.


Saturday, March 28, 2020

Making Switchel - Reenactors Gatorade

Long before the days of soda, sports drinks, energy beverages,  our 18th and 19th century ancestors had summer drinks of their own. One popular drink for a hot summer day was called Switchel.  Since no re-enactor wants to be caught downing a gatorade between historic interpretations, having a historically accurate beverage can be a great relief.  Here are the ingredients.

1/2 Gallon Water
4 Ounces Molasses (Can also use Honey)
2 Ounces Apple Cider Vinegar
1 Tablespoon Ground Dried Ginger

Although there were different variations all of these ingredients were available and are  historically accurate for both 18th century and 19th century interpretations.  I usually mix as follows:


  1. Start with 8 oz hot water. 
  2. Add the Molasses, Vinegar, and Ginger. 
  3. Add to 7 cups of cold water. (8 cups = 1/2 gallon)  


Variations 
Some folks like more Ginger and vinegar added.  Some also add a pinch of Cayenne pepper. You can also add Lemon Juice or Lime Juice. You can also try Honey instead of Molasses or try a 50/50 mix of the two.   If you want to kick it up a notch, you can also some rum to make an adult version. 

If you'd like a walk through, there's a great video from J.A.S. Townsend. 


Thursday, March 5, 2020

Home Made Hand Sanitizer

Making hand sanitizer at home is both easy and inexpensive.  It can be made with two ingredients.
  1. Aloe Vera
  2. 91% Rubbing Alcohol
Fortunately, I keep plenty of both at the house so it's always easy to whip up a batch.  Here's how you do it.

1) Cut some spires of Aloe Vera
As Aloe Vera is handy to have around, I have several plants growing in my yard. It stays soft year round so can be harvested at any time.  Let the "goop" drain out for a bit.  Supposedly, this is Latex so maybe you don't want it.


2) Carve out the Gel
I used a cheese slicer to open up the leaves, I then carved out the gel with s spoon.


3) Blend with Alcohol. 
Make sure you have the 91%, not the wimpy 70% type.  Hand sanitizer has a LOT of alcohol.  You need to keep your overall alcohol percentage at or above 62%.  If you go below,  besides not working as well, it won't evaporate off your hands and will leave you with a sticky mess.  You'll want to blend the Aloe for quite a while to break down the cellular structure then add in the alcohol.


4) Bottle!
This stuff leaks out easily and also evaporates in hot weather so something with a good stopper or lid.  you don't want to loose your precious alcohol on a hot day!  These cork based bottles are not the best, but they look nice.


5) Experiment!
Long as you keep your total alcohol at or above 62%, try different natural flavorings.  I keep oregano, mint, ginger, thyme, lemons, and rosemary all growing at the house and they all can be used for natural aroma. I also make home made vanilla.  Though, the alcohol is only 40% so you have to add it sparingly.

Sunday, February 23, 2020

Connecting the Astatic D-104 to the National NCX-5


I enjoy tinkering with and operating vintage equipment. One recent project has been a National NCX-5. Been hoping to put it on 80M in AM mode. I had not been able to get reliable audio out of this radio and started to suspect the Microphone.  I had been using an old Turner 454C.


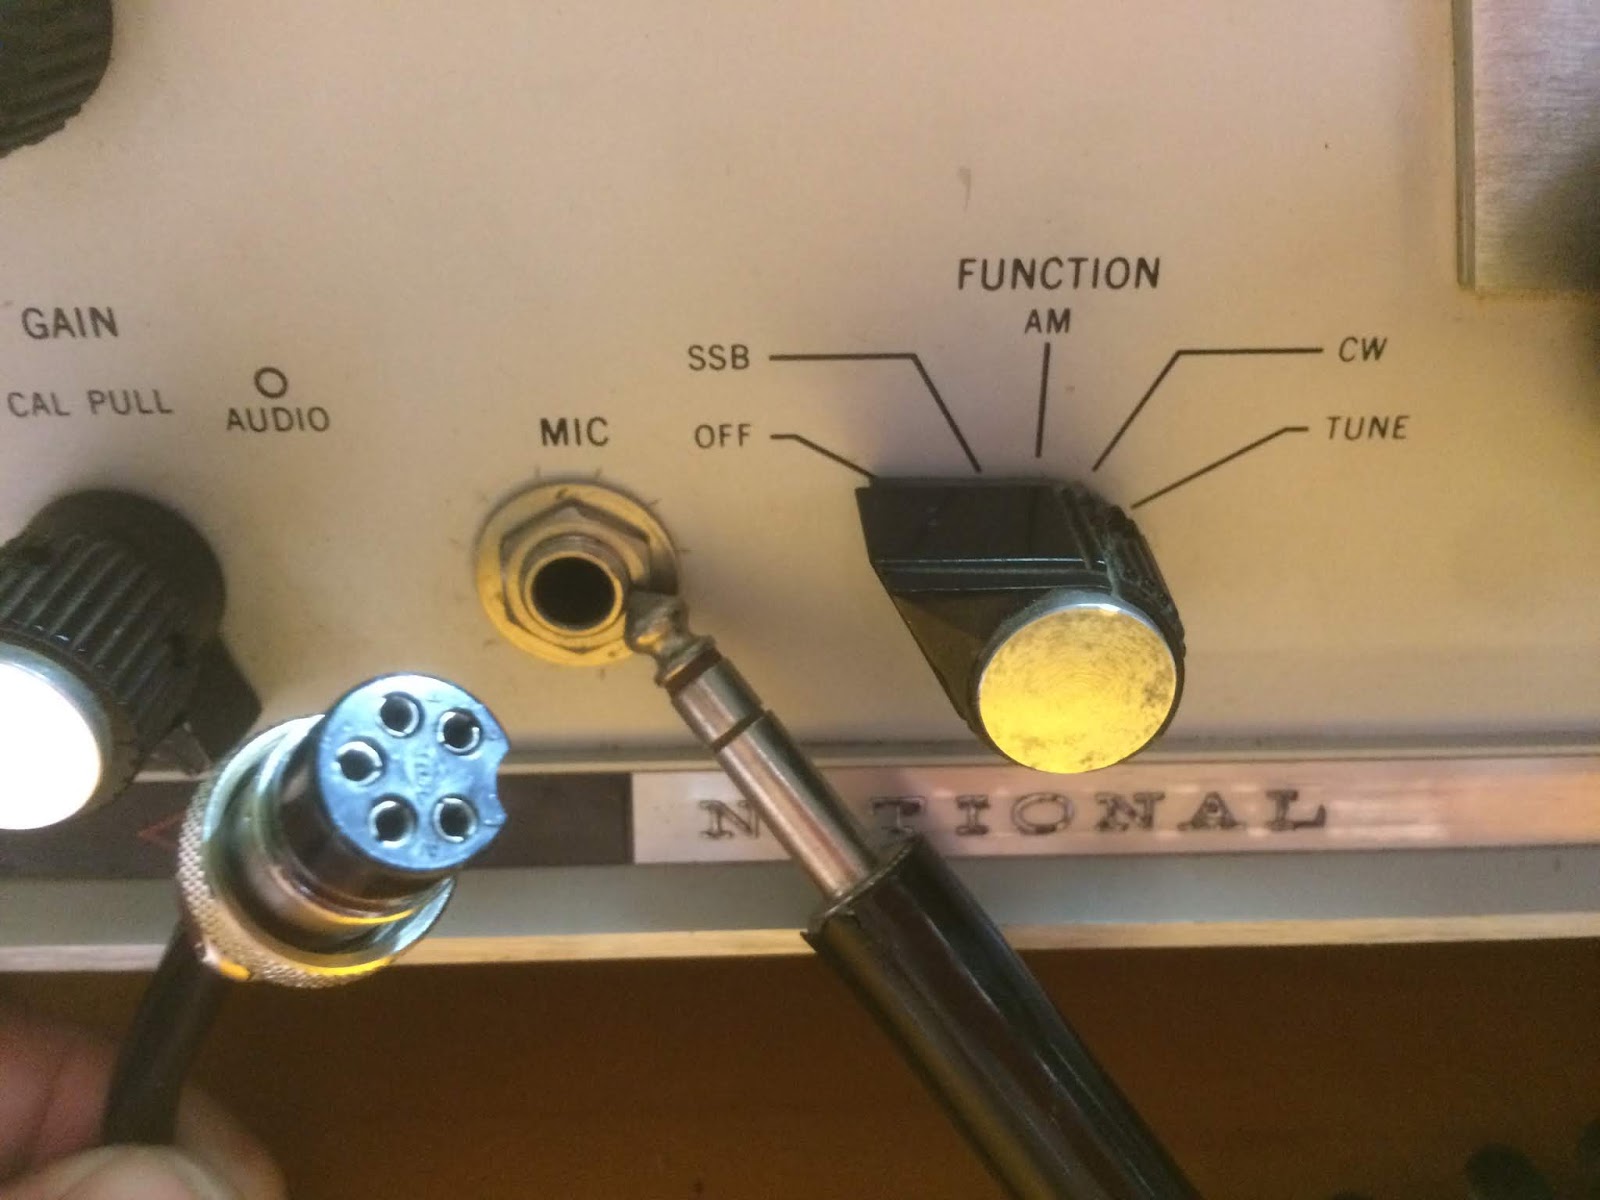
I also have an Astatic D-104 microphone and wanted to use it with the NCX-5. However, the NCX-5 takes a standard stereo 1/4 inch plug for the microphone.  My D-104 has a 5 pin CB-type connector.


I thought about re-wiring the D-104, but instead decided to leave it intact. I thought it would be more interesting to build an adapter cable.  This meant understanding the wiring on both ends.

I was able to get the manual to the NCX-5 on the Bama site. It showed how to wire up the 1/4 inch stereo jack.


The D-104 on the T-UG8 stand was a little trickier.  There were multiple connections to contend with.  Fortunately, the bottom of the microphone had a schematic.


A little time with the Ohm Meter and I was able to figure out the pins on the Mic plug. Notice that the switch is in the "R" position.


The pins on the D-104 were as follows.

Pin Color Purpose
1WhiteMicrophone
2OpenOpen
3BlackPTT Switch
4ShieldGround / Mic Ground
5RedPTT Switch

I was able to match up the pins and solder the cable appropriately.  Since the NCX-5 uses the same common for the switch and the mic ground, I ran both the Black wire and the Shied to the shield/ground on the National.  Here's what I soldered up.


Pin ColorPurposeConnected To
1WhiteMicrophone->Mic/Middle
2OpenOpen
3BlackPTT Switch->Ground/Base
4ShieldGround->Ground/Base
5RedPTT Switch->PTT/ Tip End

Here's the completed cable.


I soldered up the cable and tested things out.  PTT worked great and the radio appeared to be putting out clean audio in my tests.  Next step is some on the air tests and AM QSO's.


Thursday, October 3, 2019

What We Need From Management


Over the years, I've spent time as a Developer, Project Lead, and Scrum Product Owner as well as a manager.  In managers,  I started to identify traits felt worked well, and then traits that didn't.  I started curating a list of what I felt worked best.  This is a living list and I occasionally change things as a I learn.


  • Serve The Team 
  • Management is a service position. Be sensitive to the needs of the team as they rely on you to find resources, eliminate distractions, help with organization, resolve conflicts, communicate important information, and help provide redirection when things go wrong. 
  • Help With Conflict Resolution 
  • There will always be personality conflicts within a group. Sometimes it takes someone with the "manager" title to help diffuse them. 
  • Provide Resources
  • Every product owner, stakeholder, and customer is going to advocate for their interests (as they should).  Relationships will develop as folks become familiar with the needs of others.  Yet, the resources of a technology department are finite. The manager needs to spend time understanding these needs and how they reflect to business value so resources can be spent where they have the most impact. 
  • Communicate The Wider Vision 
  • With greater exposure to the long term vision of an organization, the manager holds valuable information to share about where the organization is going. Although it's important that the team understand these things, they shouldn't have to sit through hours of meetings to gather them.  
  • Provide External Visibility
  • The team is focused on their project. The Manager has bandwidth to get visibility into the projects of other groups by communication with other managers. This can can then be exposed to the team to point them into areas that will need their attention.
  • Help With Meeting Attendance
  • A single one hour meeting can cost between 4 and 8 hours of development productivity.  However, as someone who already attends meetings full time, the manager's cost of attending  meetings is low. The manager then has the ability to communicate the important and critical points back to the team. 
  • Allow The Team To Work Out Their Process
  • Documentation,  task/bug/defect/story tracking, version control, tests, design reviews, code reviews, testing, and documentation are all very important parts of software development. They are the things that separate a "Programmer" from a "Software Engineer".  As a software engineer has these things in their wheelhouse,  the manager should respect the decisions of the team. A manager should  suggest ways things could be better, help evaluate options, and help build consensus if folks can't agree, but ultimately, it's up to the team. 
  • Allow Room To Take Risks
  • The team is going to make wrong decisions, and do risky things. It's important that management give the team room to to do this. 
  • Keep A High Level
  • Management maintains a close relationship with other managers so they may make suggestions around priorities and staffing.  Certainly the manager should work with the team on the long term roadmap.  However,  there should also be room for folks to experiment.  A developer may pick up a small task in between meetings or respond to an e-mail that is not a primary task and they need the freedom to do this. 
  • Suggest Opportunities For Growth
  • Whether it's specific training opportunities, advanced education, speaking and interview opportunities, professional organizations, or cross divisional relationships, the manager should aggressively search out these opportunities for the team and make them aware.  Folks do their best work when aligned with their passion. Although management might have a passion for a particular process, language, or platform, this might not be same as the passions of their people. People should be allowed to follow their own passion as much as reasonably possible. 
  • Manage By Walk Around
  • Management is something that has to be done in person. Get out and talk with the team every day.  Video conference and phone calls are not the same.